

जानें IPO Allotment Status 2025 कैसे चेक करें — PAN, Application Number, BSE, NSE, KFintech, Link Intime और Broker Apps के जरिए सिर्फ 1 मिनट में। Step-by-step हिंदी गाइड, oversubscription tips, refund process, Demat credit और 20 FAQs के साथ पूरी जानकारी। Short-term listing gains या long-term holding strategy समझें और अपनी निवेश योजना स्मार्ट बनाएं।
परिचय — क्यों यह ब्लॉग पढ़ना ज़रूरी है
IPO में apply करने के बाद सबसे बड़ा पल होता है — पता लगाना कि आपको शेयर मिले या नहीं। यही पल तय करता है कि आपका पैसा शेयर में लॉक हुआ या वापस मिल रहा है। इसलिए IPO Allotment Status हर निवेशक के लिए critical है। खासकर 2025 में, जहां नए IPOs तेजी से आते हैं और retail investors बहुत सक्रिय हैं, allotment का सही तरीके से चेक करना और उसे समझना बेहद ज़रूरी है।
यह गाइड पूरी तरह हिंदी में और आसान भाषा में लिखा गया है — ताकि आप 1 मिनट में PAN/Application नंबर से यह जान सकें कि allotment हुआ या नहीं। हम step-by-step बताएंगे कि BSE, NSE, KFintech, Link Intime और आपके broker app से कैसे चेक करें, साथ ही allotment process के technical पहलू, oversubscription के नियम, refund टाइमलाइन, और वही छोटे-छोटे mistakes जिनसे आम लोग परेशान हो जाते हैं।
अगर आपने हाल ही में किसी IPO में apply किया है या आने वाले IPOs में participate करना चाहते हैं, तो यह गाइड आपके लिए step-by-step manual भी है और checklist भी। चलिए शुरू करते हैं — पहले समझते हैं कि IPO allotment status असल में होता क्या है।
IPO Allotment Status क्या है?
IPO Allotment Status का सीधा सा मतलब है — वह स्थिति जो बताती है कि आपकी IPO application के आधार पर कंपनी ने आपको कितने शेयर allot किए हैं। जब कोई कंपनी IPO जारी करती है, तो बहुत सारे निवेशक उस IPO में apply करते हैं। सबकी मांग अलग होती है; registrar और exchange मिलकर final allotment तय करते हैं। Allotment status तीन तरह से दिख सकता है: full allotment (आपको आपकी मंजूर मात्रा मिली), partial allotment (कुछ शेयर मिले), या no allotment (आपको कुछ नहीं मिला)।
Allotment का process automated और regulated होता है। Registrar invalid applications (गलत PAN, duplicate applications, payment failure) हटाते हैं और valid entries को categories में बाँटकर finalizing करते हैं। Retail category में अक्सर lottery या computerized draw से allotment होता है, इसलिए बहुत सारी बार retail investors को allotment नहीं मिलता — खासकर oversubscribed IPOs में। QIB और HNI categories में अलग नियम लागू होते हैं।
Allotment status जाँचना इसलिए ज़रूरी है क्योंकि इससे investor को पता चलता है: (a) क्या उसके shares demat में आएँगे, (b) अगर नहीं आएँ तो refund कब आएगा, और (c) अगली strategy क्या हो — listing day पर बेचना है या long-term hold।
IPO Allotment Status क्यों जरूरी है?
Allotment status सिर्फ result नहीं है — यह आपकी आगे की financial planning का आधार बनता है। मान लीजिए आपने किसी IPO में apply किया और आपको full allotment मिल गया — अब आपके पास शेयर आ गए हैं, आप decide कर सकते हैं कि listing day पर बेचकर short-term profit लेना है या कंपनी के fundamentals देखकर long-term रुख अपनाना है। दूसरी ओर, अगर allotment नहीं मिला तो आपका fund refund के रूप में बैंक में आ जाएगा — और आप उसे किसी दूसरे IPO या investment में लगा सकते हैं।
Allotment status investment psychology पर भी असर डालता है। कई निवेशक allotment का इंतज़ार करते-करते anxious हो जाते हैं; सही status मिलने से clarity मिलती है और knee-jerk decisions से बचा जा सकता है। इसके अलावा regulatory कारणों से भी यह पता होना ज़रूरी है — कभी-कभी registrar की गलती या wrong details (जैसे गलत PAN) की वजह से applications reject हो जाते हैं।
IPO Allotment Process — Inside View
Allotment process कुछ technical steps में होता है पर इसे आसान भाषा में समझें तो: (1) IPO subscription होता है — investors apply करते हैं; (2) registrar सभी applications authenticate करता है; (3) invalid entries filter होते हैं; (4) valid entries category-wise (Retail/HNI/QIB) रखा जाता है; (5) oversubscription होने पर lottery या proportional allocation किया जाता है; (6) final allotment list generate होती है और registrar उसे publish करता है; (7) shares allot होने पर demat accounts में credit होते हैं और जो लोग नहीं मिले उन्हें refund किया जाता है।
Registrar का role central है — वही final list publish करता है। SEBI की नज़र में यह पूरा process fair और transparent होना चाहिए — इसलिए computerized systems, audit trails और timestamps का इस्तेमाल होता है। Retail category के लिए computerized draw सुनिश्चित करता है कि कोई manual bias न रहे। HNI category में proportional basis allocation होता है — मतलब जितना बड़ा निवेश, उतना ज्यादा allot होने की संभावना। QIBs को institutional quota मिलता है।
Step-by-step technicalities जानने से आप better investor बनते हैं — यह समझते हुए कि क्यों कभी-कभी delay होता है, क्यों refund में समय लगता है और क्यों कुछ applications invalid माने जाते हैं (duplicate PAN, invalid UPI, bank block आदि)।
IPO Allotment Status कब आता है?
Usually, IPO allotment status IPO के close होने के बाद 4–7 calendar days में declare कर दिया जाता है। यह timeline कम्पनी के prospectus (RHP) और registrar के schedule पर निर्भर करती है। SEBI guidelines के तहत allotment और refund की timelines तय होती हैं ताकि investors का पैसा unnecessarily फँसा न रहे। लेकिन कुछ rare मामलों में technical या regulatory issues की वजह से delay भी हो सकता है।
Allotment date से पहले companies अपने issue timetable में tentative dates दे देती हैं — जैसे issue opening/closing date, basis of allotment date, refund initiation date और listing date। इसलिए IPO apply करते समय उस timetable पर नजर रखना चाहिए। कुछ brokers और registrars SMS/email alerts भी भेजते हैं जिससे investor को instant पता चल जाता है।
Practical tip: अगर allotment date के बाद 24–48 घंटे तक status नहीं दिखे तो registrar की site/notice को देखें या broker से confirm कर लें — पर ज्यादातर cases में 4–7 दिन में status live हो जाता है।
IPO Allotment Status चेक करने के तरीके — Full List

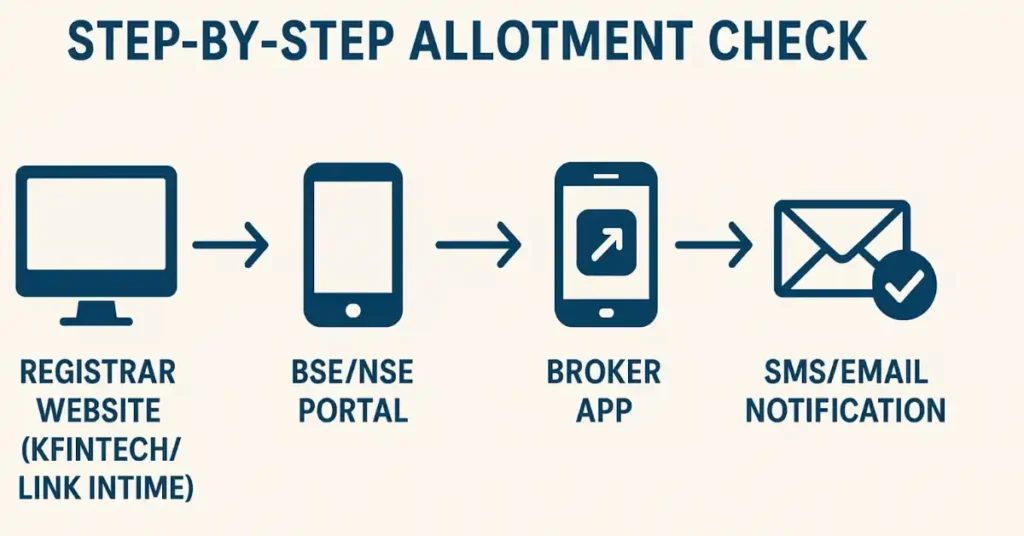
किसी भी IPO का allotment check करने के चार प्रमुख तरीके हैं: (A) Registrar की Official Website (जैसे KFintech, Link Intime), (B) BSE / NSE का IPO allotment portal, (C) Broker Apps / Websites (Zerodha, Groww, Angel One, ICICI Direct, Paytm Money आदि) और (D) SMS / Email Alerts।
Registrar की वेबसाइट सबसे authentic है क्योंकि वही final allotment list host करती है। BSE/NSE का portal भी reliable है, पर registrar पहली जगह होती है जहाँ final list upload होती है। Broker Apps user-friendly हैं — वहाँ login करने के बाद IPO section में allotment status आसानी से दिख जाता है और कई बार broker automatically notify भी कर देता है। SMS/Email का फायदा यह है कि आपको manual check न करना पड़े — पर यह optional होता है और न मिलने पर self-check कर लें।
Step-by-step (short): registrar site → IPO name select → PAN या application number डालें → captcha/submit → result। Broker app में login → portfolio/IPO section → application details → allotment status।
BSE और NSE पर Allotment Status कैसे देखें
BSE और NSE दोनों exchanges अपने portals पर IPO allotment status देखने का option देते हैं। प्रक्रिया लगभग समान है: exchange की website पर जाएँ, IPO allotment/issue section में जाएँ, company का नाम या symbol चुनें और PAN/application number डालें। Submit करने पर result दिख जाएगा।
BSE की साइट पर अक्सर “Equity > IPO > Allotment Status” जैसा path होता है; NSE पर भी IPO section में similar interface मिलता है। इन portals का फायदा यह है कि exchange level पर data दिखता है और यह trading ecosystem का हिस्सा है। पर ध्यान रहे कि final authority registrar है — इसलिए अगर कोई discrepancy मिले तो registrar की site को primary मानें।
Practical tip: BSE/NSE पर check करते समय browser cache/auto-fill को disable करें और PAN सही डालें — छोटे-छोटे typing errors के कारण result ना दिखेगा|
Registrar Websites (KFintech और Link Intime) — सबसे भरोसेमंद तरीका
Registrar websites — खासकर KFintech (Kfintech kosmic portal) और Link Intime — allotment status देखने के लिए सबसे reliable स्रोत हैं। Registrar final allotment list publish करते हैं और refund instructions भी वहीं से आते हैं। Registrar page पर आम तौर पर तीन तरह की जानकारी माँगी जाती है: PAN, application number और DP ID/Client ID।
KFintech portal पर आपको IPO नाम select करने के बाद PAN या application number डालना होता है; कुछ cases में captcha भी होगा। Link Intime पर similar interface है। Registrar पर result आने के बाद अक्सर email/SMS भी भेज दिए जाते हैं, पर primary data वही रहेगा। Registrar पर check करने का advantage यह है कि आप exact record देख सकते हैं — जैसे number of shares allotted, client ID और refund status।
Security note: केवल registrar की official site से ही details चेक करें — fake sites और phishing ट्रैफिक से सावधान रहें।
Broker Apps से Allotment Status कैसे चेक करें
आज के जमाने में brokers जैसे Zerodha, Groww, Angel One, ICICI Direct, Paytm Money इत्यादि apps से allotment status देखना सबसे आसान तरीका है। App में login करने के बाद IPO section पर जाएँ; वहाँ आपकी applied IPOs की list और उन्हीं के सामने allotment status दिखाई देता है। कुछ brokers SMS/Push notification भी भेजते हैं।
Broker की advantage यह है कि PAN और application details पहले से linked होते हैं — इसलिए manual entry की जरूरत कम रहती है। कई brokers “Order Book” या “IPO” tab में apply history और status दिखाते हैं। पर याद रखें: broker app में दिखी हुई जानकारी convenient है पर primary source registrar ही है — अगर discrepancy हो तो registrar को cross-check करें।
Tips: Broker app notification enable रखें और allotment date पर ऐप refresh कर लें।
Retail vs HNI vs QIB — Allotment Rules का फर्क
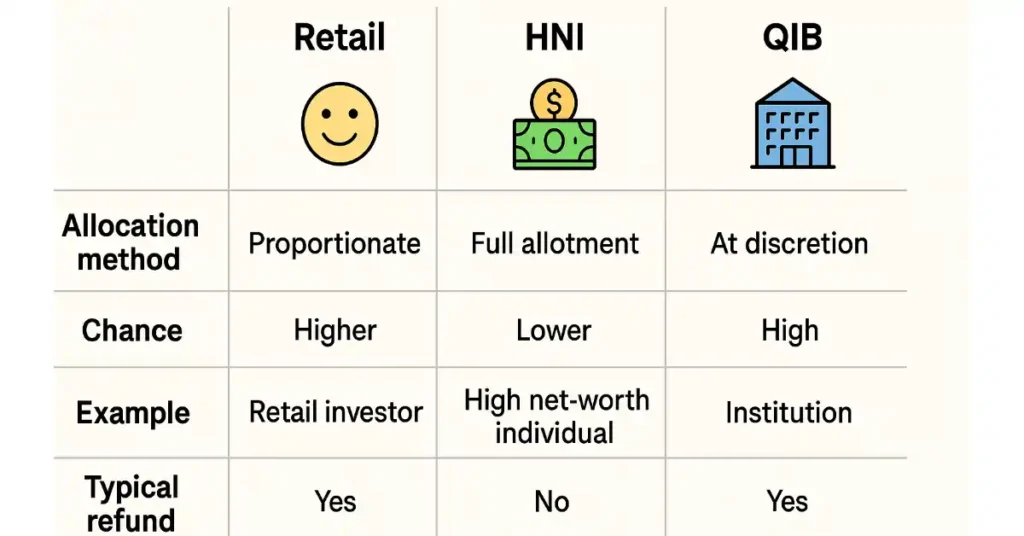
IPO allotment तीन प्रमुख investor categories में बाँटी जाती है: Retail (रिटेल), HNI (High Net-worth Individuals) और QIB (Qualified Institutional Buyers)। प्रत्येक के लिए quota और allotment नियम अलग होते हैं।
- Retail: ज्यादातर छोटे investors आते हैं; retail quota में lottery या computerized draw से allocation होता है। Retail applicants का aim सामान्यत: quick listing gains होता है।
- HNI: बड़े individual applicants; proportional allotment मिलता है — जितना बड़ा मनी contribution, उतना ज्यादा प्रतिशत allocation।
- QIB: institutional investors; इनके लिए quota predefined होता है और इन्हें often guaranteed allocation मिलता है।
Category-wise allocation की वजह से oversubscription के दौरान retail investors का experience अलग होता है। उदाहरण के तौर पर एक heavy oversubscribed IPO में retail को सिर्फ एक lot मिल सकता है, जबकि QIBs को large chunks मिल जाते हैं। इसलिए apply करते समय category rules समझना जरूरी है।
अगर allotment नहीं मिला — Refund Process
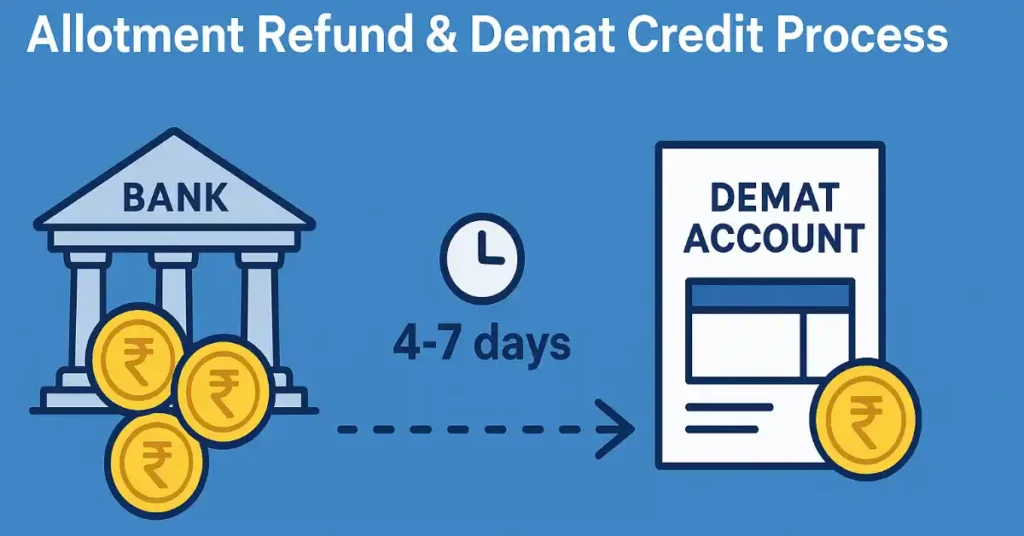
Allotment न मिलने पर सबसे बड़ी चिंता refund है — कब और कैसे पैसा वापस आएगा। इस प्रक्रिया को smooth और fast बनाने के लिए SEBI और registrars predefined timelines पर काम करते हैं। आम तौर पर refund 4–7 working days में initiate और process होकर bank account/UPI में वापस आ जाता है।
Refund का तरीका transaction mode पर निर्भर करता है: ASBA की स्थिति में bank amount unblock करता है; UPI apply में blocked amount auto-cancel होकर वापस होता है; net-banking/debit के मामले में registrar/bank direct refund कर देते हैं। KYC/UPI mismatch या technical issue होने पर refund delay हो सकता है — इसलिए apply करते समय bank/UPI details सही भरें।
Practical check: अगर refund की timeframe पार हो जाए तो registrar की website में refund status चेक करें और broker से संपर्क करें। ज्यादातर cases में refund timely मिलता है पर edge cases में delay resolution registrar और bank दोनों के बीच लंबा चल सकता है।
Demat Account और Allotment का संबंध
Allotment होने के बाद shares electronic रूप में आपके Demat Account में क्रेडिट होते हैं। Demat account (DP ID + Client ID) ही आपका unique identifier है जहाँ alloted shares दिखाई देते हैं। इसलिए IPO apply करते समय DP/Client ID सही भरना बहुत जरूरी होता है। गलत Demat details भेजने पर allotment fail हो सकती है या shares refund हो सकते हैं।
Allotment के तुरंत बाद registrar shares को depository (NSDL/CDSL) के माध्यम से credit करना शुरू कर देता है — यह प्रक्रिया listing से पहले complete हो जाती है। कुछ rare cases में shares credit में delay आ सकता है — जैसे demat account mismatch, frozen account या KYC issues। इसलिए IPO apply से पहले demat active और details updated रखें।
Bonus tip: demat account में पूछताछ करने के लिए अपने DP/Depository या broker की helpdesk service उपयोग करें — वे आपको client ID, ISIN और credited holdings verify करने में मदद करेंगे।
Common Mistakes जो Investors कर देते हैं
कई बार छोटी-छोटी गलतियाँ IPO allotment miss कराने या refund delay करने का कारण बनती हैं। कुछ आम mistakes:
- Wrong PAN entry — PAN typo की वजह से application invalid हो सकता है।
- Multiple applications from same PAN — SEBI rules के हिसाब से एक PAN एक valid application। Duplicate entries reject हो सकती हैं।
- Incorrect Demat details (DP/Client ID) — shares credit में problem आएगी।
- UPI mandate न approve करना — payment failure से application invalid होगा।
- Wrong registrar link या fake site पर जाना — security risk और phishing का खतरा।
इन सभी mistakes से बचने के लिए apply से पहले PAN, demat detail और payment method double-check करें। Application submit होने के बाद confirmation SMS/Email संभाल कर रखें।
Oversubscribed IPOs में Allotment के Chances कैसे बढ़ाएं
Oversubscription में allotment chances बढ़ाना 100% possible नहीं है, पर कुछ strategies से marginal improvement मिल सकती है:
- Cut-off price पर apply करें — कुछ IPOs में cut-off applicants को priority मिल सकती है।
- Apply through multiple modes (if allowed) — ध्यान रहे SEBI के नियम के अनुसार same PAN पर multiple valid applications allowed नहीं हैं; पर authorized multiple demat holders (family members) apply कर सकते हैं।
- Apply early (but within rules) — कुछ technicalities के कारण initial valid applicants का advantage होता है।
- High-quality IPOs चुनें — reputed companies में oversubscription ज़्यादा होता है पर long-term benefit मिलता है।
- Broker की latest guidance follow करें — broker कभी-कभी allotment trends बताते हैं।
ध्यान रखें: retail allotment ज्यादातर lottery पर निर्भर होती है — इसलिए risk manage करें और हर IPO में over-apply करने से बचें।
Listing Gains बनाम Long-Term Holding — Decision Framework
Allotment मिलने के बाद सबसे बड़ा सवाल — बेचें या hold रखें? यह निर्णय आपकी investment objective, risk appetite और company fundamentals पर निर्भर करता है।
- Listing Gains (short term): अगर market sentiment और Grey Market Premium (GMP) positive है तो कुछ investors listing day पर sale करके quick profit book कर लेते हैं। यह strategy speculative है और transaction costs, taxes और timing risk के साथ आती है।
- Long-Term Holding: अगर कंपनी के fundamentals strong हैं (business model, management, balance sheet), तो long-term holding अधिक sustainable return दे सकता है। IPO stage पर company के future growth prospects और valuation देखना ज़रूरी है।
Decision Tips: 1) pre-listing research करें; 2) listing day के volume और price action पर नजर रखें; 3) short-term gains पर tax implications (capital gains) समझें; 4) exit strategy तय रखें।
Recent IPO Case Studies और Lessons
कुछ recent IPO examples से हम allotment और listing behavior समझ सकते हैं — ध्यान दें कि यहाँ हम qualitative lessons दे रहे हैं न कि fixed returns guarantee।
- Consumer-tech IPOs: जो companies strong brand और growth story दिखाती हैं, उन IPOs में often heavy demand आती है और listing-day volatility ज़्यादा देखा गया है। Retail investors को lottery में हिस्सा मिलना मुश्किल हो सकता है।
- Large PSU या marquee issues: इनमें institutional allocation major role निभाता है; retail allotment ratio tight हो सकता है।
- Niche sector IPOs: ज्यों-ज्यों sector hype बढ़ती है (eg. fintech, renewable), oversubscription बढ़ जाता है।
Lessons: IPO में apply करने से पहले company का RHP पढ़ें, peer valuation देखें और risk-reward समझें। Allotment और listing के outcomes unpredictable होते हैं — इसलिए portfolio diversification रखें।
PAN से 1 मिनट IPO Allotment Status कैसे Check करें — Step-by-Step
PAN number सबसे सरल और common identifier है allotment check करने का। Step-by-step:
- Registrar की official website खोलें (KFintech/Link Intime)।
- IPO allotment page पर जाएँ और company name चुनें।
- PAN field में अपना PAN डालें (CAPS/format सही रखें)।
- Captcha/verification भरें और Submit/Check पर क्लिक करें।
- Result में allotment की संख्या, refund status और client ID दिखेगा।
PAN से check करने का फायदा यह है कि यह application number भूल जाने पर भी काम आता है। बस PAN वही होना चाहिए जो application में use किया गया था। अगर joint account या minor पर apply किया है तो relevant PAN से check करें।
Application Number से Allotment कैसे Check करें
Application number से check करना थोड़ा और specific होता है — यह unique reference होता है जो आपने apply करते समय पाया था। Registrar या exchange portal पर application number डालकर आप direct result देख सकते हैं।
Steps: registrar site → IPO name select → application number enter → submit. Application number method तब useful है जब multiple family members same PAN से अलग- अलग applications कर रहे हों (valid होने पर)। Application number safe रखने का tip: apply confirmation email/SMS में यह number होता है — उसे सुरक्षित रखें।
अगर application number काम न करे तो PAN method इस्तेमाल करें। दोनों तरीके reliable हैं पर application number direct mapping देता है।
Mobile Apps से Allotment — Instant तरीके
Mobile apps ने IPO allotment checking को असान और instant बना दिया है। Zerodha, Groww, Paytm Money, ICICI Direct जैसे brokers app में notification और auto-sync features होते हैं। App में login करें → IPO/Orderbook section → applied IPO चुनें → allotment status दिखाई देगा।
Mobile apps की advantage यह है कि वहीं से आप तुरंत sell/buy orders डाल सकते हैं, watchlist update कर सकते हैं और broker support तुरंत contact कर सकते हैं। परRemember: app UI अलग-अलग brokers में अलग होगा — इसलिए उस broker के help section को follow करें। Security: OTP/2FA enable रखें और apps को official stores से ही download करें।
Myths vs Reality — Common Misconceptions
कुछ common myths हैं जिन पर investors अक्सर भरोसा कर लेते हैं — इन्हें समझना ज़रूरी है:
- Myth: ज्यादा applications करने से allotment chances बढ़ते हैं.
Reality: SEBI के नियमों के مطابق एक PAN पर एक ही valid application स्वीकार्य है। Duplicate applications reject हो सकती हैं। - Myth: Broker का influence allotment में रहता है.
Reality: Allotment computerized और registrar-managed होता है; brokers का manual involvement नहीं होता। - Myth: ज्यादा money लगाने से retail allotment पक्का हो जाएगा.
Reality: Retail category में allocation lottery या equal chance system पर निर्भर करती है, न कि invested amount पर। - Myth: अगर allotment नहीं मिला तो IPO bad है.
Reality: Allotment न मिलना company की quality का indicator नहीं है; अक्सर oversubscription की वजह से ऐसा होता है।
इन myths को जानने से आप emotionally overreact करने से बचेंगे और सही investment decisions ले पाएँगे।
Practical Checklist — IPO Apply करते समय क्या ध्यान रखें
IPO apply करने से पहले यह checklist जरूर फॉलो करें:
- PAN verified और सही format — CAPS/typing mistakes से बचें।
- Demat Account active और DP/Client ID verified — wrong details से allotment fail हो सकता है।
- UPI/BANK details correct और linked — payment failures से application invalid।
- Only one valid application per PAN — duplicate entries से rejection।
- RHP और company financials पढ़ें — valuation, peer comparison और risk समझें।
- Application confirmation SMS/Email save करें — application number और timestamp के लिए।
- Allotment date note करें — 4–7 days window पर self-check करें।
- Broker notification on — push alerts और emails enable रखें।
इन simple steps से आपकी chances और process smoothness काफी बढ़ जाती है।
Tools और Resources — किन Platforms/Pages को फॉलो करें
Useful tools और resources:
- Registrar portals (KFintech, Link Intime) — primary source।
- BSE / NSE IPO pages — exchange-level info।
- Broker platforms (Zerodha, Groww, Angel One) — convenience और notifications।
- SEBI website — regulatory updates और investor advisories।
- Company RHP / Prospectus — financials, objectives और risk factors।
- Stock forums / analyst reports — secondary research; पर cross-check करें।
इन resources को save कर लें और IPO apply करते समय उन्हें cross-verify करें। Official registrar and exchange links हमेशा bookmark करें और phishing से बचें।
निष्कर्ष — Final Takeaways
IPO allotment status जानना निवेश का एक अहम हिस्सा है। सही तरीके से check करने से आप timely decision ले सकते हैं — चाहे वह listing दिन बेचने का हो या long-term hold का। इस गाइड में हमने cover किया: allotment का मतलब, process, कब आता है, कैसे check करें (BSE, NSE, Registrar, Broker), refund प्रक्रिया, demat कनेक्शन, common mistakes, oversubscription strategies, और practical checklist।
Key takeaways:
- Registrar की वेबसाइट primary source है।
- PAN और application number हमेशा handy रखें।
- Oversubscription में luck matter करता है — इसलिए risk manage करें।
- Refund timely आता है पर details सही भरना ज़रूरी है।
- Short-term listing gains और long-term holding दोनों के pros/cons समझकर strategy बनाएं।
यदि आपको यह गाइड helpful लगे तो इसे शेयर करें और अपने अनुभव नीचे comments में लिखें — किस IPO में apply किया, allotment मिला या नहीं, refund कैसा आया — इससे दूसरों को भी फायदा होगा।
FAQs
- IPO allotment status कैसे चेक करें?
Registrar (KFintech/LinkIntime), BSE/NSE portals या broker apps पर PAN/application number डालकर allotment result चेक करें। - IPO allotment कब आता है?
अमूमन IPO closing के 4–7 calendar days में allotment status घोषित होता है। - अगर allotment नहीं मिला तो refund कब आएगा?
Refund आमतौर पर 4–7 working days में bank/UPI के माध्यम से वापस कर दिया जाता है। - Retail और HNI में क्या फर्क है?
Retail लगभग lottery-based allocation, HNI proportional allocation, QIB institutional quota के तहत मिलता है। - क्या multiple applications allowed हैं?
नहीं — एक PAN पर केवल एक valid application नियम के अनुसार मान्य होती है। - UPI mandate approve नहीं हुआ तो क्या होगा?
UPI authorize नहीं होने पर application invalid माना जा सकता है और refund process follow होगा। - Allotment के बाद shares कहाँ दिखेंगे?
Allotted shares आपके Demat account में credit होकर दिखेंगे, आमतौर पर listing से पहले। - Registrar कौन सी site है सबसे भरोसेमंद?
KFintech और Link Intime भारत के प्रमुख registrars हैं; वही सबसे reliable सूचनाएँ देते हैं। - Broker का role allotment में कितना है?
Broker केवल facilitation करते हैं; allotment computerized और registrar-managed होता है। - IPO oversubscription क्या होता है?
جب demand shares से अधिक हो, तो IPO oversubscribed कहलाता है और allocation lottery/proportion से होता है। - Application number भूल गया तो?
PAN के जरिए भी allotment check कर सकते हैं — PAN method backup के रूप में काम आता है। - IPO listing day पर पहले sell करें या hold रखें?
Decision आपकी strategy पर निर्भर करता है — immediate gains या firm fundamentals के आधार पर long-term hold। - Demat details गलत होने पर क्या करें?
Registrar या DP/Broker से तुरंत contact कर details rectify कराएँ, पर timing critical होती है। - NRI investors allotment कैसे check करें?
NRI भी registrar site पर PAN/ application number से allotment verify कर सकते हैं। - IPO refund delayed है तो क्या करें?
Registrar support या broker helpdesk से contact करें; bank reconciliation की जानकारी माँगें। - Cut-off price पर apply करने के फायदे?
कुछ IPOs में cut-off applicants को preference मिल सकती है; पर हर issue में अलग rules होते हैं। - Grey Market Premium (GMP) का क्या मतलब?
GMP unofficial indicator है listing-day interest का; पर regulated नहीं और speculative हो सकता है। - IPO apply करने से पहले क्या पढ़ना चाहिए?
Company RHP, valuation, peer comparison, promoter background और financial statements पढ़ें। - IPO में guaranteed allotment possible है?
Institutional investors के लिए certain quotas होते हैं; retail investors के लिए guaranteed allotment नहीं। - Allotment status दिखने के बाद अगला कदम क्या होगा?
Shares मिलने पर listing strategy तय करें; नहीं मिलने पर refund monitor करें और अगले investment options evaluate करें।
Disclaimer
इस ब्लॉग में दी गई जानकारी केवल शैक्षिक और जानकारी साझा करने के उद्देश्य से लिखी गई है। हम किसी भी प्रकार की निवेश सलाह (Investment Advice) प्रदान नहीं करते। IPO allotment status, refund process, या listing gains से जुड़ी सभी जानकारी सार्वजनिक स्रोतों, SEBI guidelines और official registrar websites पर आधारित है।
निवेश से पहले हमेशा अपने वित्तीय सलाहकार (Financial Advisor) से परामर्श लें। ब्लॉग लेखक और प्रकाशक किसी भी प्रकार के आर्थिक लाभ/हानि, गलत allotment status या निवेश निर्णय के लिए जिम्मेदार नहीं होंगे।
IPO allotment check करने के लिए केवल BSE, NSE, KFintech, Link Intime जैसी official websites और अपने registered broker platforms का ही उपयोग करें। किसी भी third-party या unknown source से सावधान रहें।

